Setting up your Lifeclock One
- What’s in the Box
- Minimum Device Requirements
Getting Started
- Turning the Lifeclock One on
- Pairing with your device (iOS)
- Pairing with your device (Android)
- Using the Lifeclock One without pairing
Battery & Charging
- Battery
- Charging
App Home screen (iOS)
Countdown Timer
Time and Date
- Setting the Time & Date
- Displaying the Time
- Displaying the Date
- Behavior
Connecting your Lifeclock One
Turning the Lifeclock on and off
Stopwatch
World Clocks
Scroll Speed
Camera
Alarms
Compass
Pedometer
Movie Mode
Brightness
Animations
Display Duration
App Notifications
Software Update and Update Mode
Wrist Configuration
About your Lifeclock One
Supported characters
Support
Device Reset
Cleaning and Maintenance
- Cleaning
- Strap
Legal Notice
Safety Instructions
- Use and Storage
- Water Resistance
- Safety
- Service and Maintenance
- Responsible Use
- Cleaning your Lifeclock One
Warranty
Regulatory Statements
What’s In The Box
Your Lifeclock One box includes the following:
- Custom Lifeclock One collectors display box
- Printed insert + foam protector
- Lifeclock One (Snake, Gullfire or your custom Edition)
- 2 x Lifeclock One charging cables
Minimum Device Requirements
The Lifeclock One does not require a mobile device for minimal use, however some of its functions require the use of the Lifeclock One app (the “App” on either an iOS or Android enabled device.
The App can be downloaded from the Apple App Store™ or the Google Play™ Store for the device of your choice. The minimum iOS device operating system version is 9.0 and higher. The minimum Android device operating system version is 6.0 and higher. If your device does not support these operating systems or you do not have a mobile device, you can still use your Lifeclock One. Without a mobile device you can use the following features:
- Time & Date (you will be able to manually set the time)
- Stopwatch
- Countdown timer
- Battery status
- Compass
- Brightness
- Step counting
- About screen
The App is required for the following functions:
- App/call notifications
- Animation configuration
- Scroll speed
- World clocks
- Display duration
- Movie mode
- Camera
- Firmware update
Turning the Lifeclock One on
Your Lifeclock One is shipped to you with the power off. To turn the power on press and hold the bottom button for 5 seconds – the watch will vibrate and the display will come on. If the watch does not turn on, please charge your Lifeclock One (See the ‘Battery & Charging’ section). We charge your Lifeclock One before we ship it but if the watch is stuck in transit for a long period of time you’ll need to recharge it.
Pairing with your device (iOS)
Remove your Lifeclock One from the box and press any side button to turn it on. You’ll see a welcome message appear on the watch customized to you.
If you don’t see a welcome message, it’s likely that the battery needs to be recharged. See the ‘Battery & Charging’ section on how to charge the Lifeclock One.
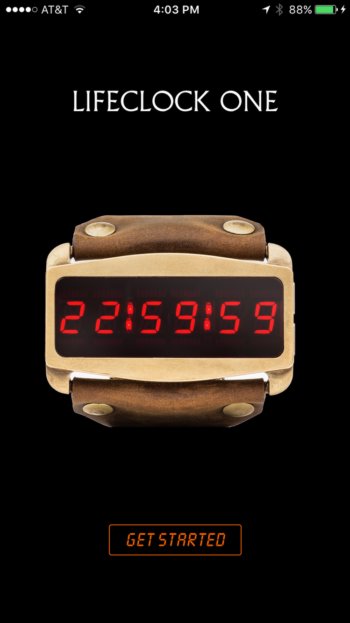
Open your iOS App Store and search for ‘Lifeclock One’. Install the App from the App Store and open it to get started.
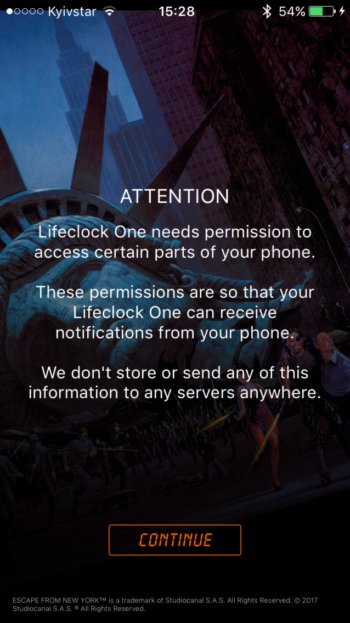
You’ll be alerted that the app will ask for permission to access certain parts of your phone so that it can receive and push notifications to your Lifeclock One.
Tap ‘Continue’ to continue.
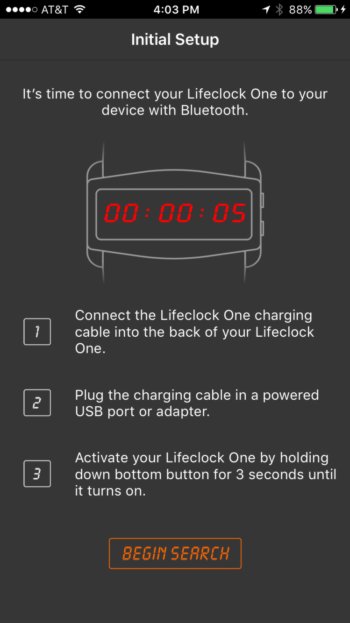
The app will guide you in making sure that your Lifeclock One is turned on and charged.
Tap ‘Begin Search’ to start the pairing process.
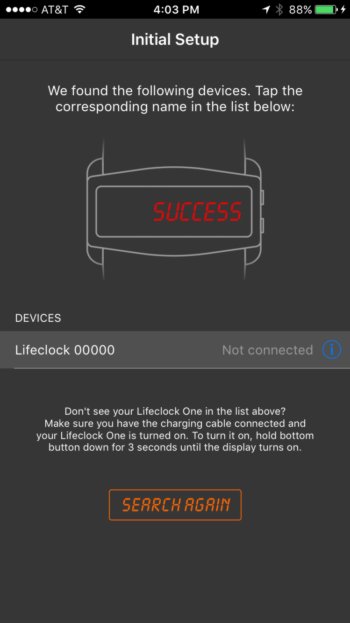
The app should find your Lifeclock One, and it will be listed as shown in the diagram here. Your serial number will be indicated as part of the device name. In the example here, the serial number of the Lifeclock One is 00000.
Tap the device entry to start pairing. In this example, you would tap on ‘Lifeclock 00000’.
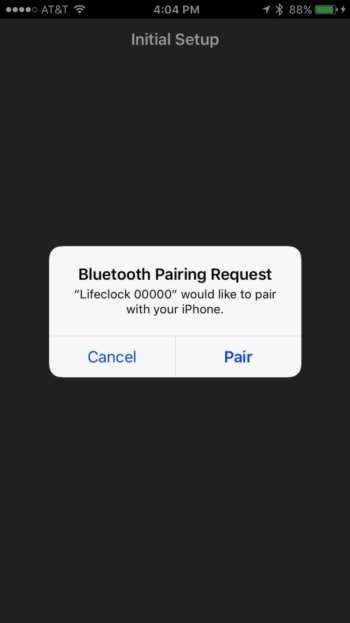
The phone will ask you to confirm that you want to pair with your Lifeclock One.
Tap ‘Pair’.
You should see ‘Paired’ appear on your Lifeclock One and then the time will be synced and up to date.
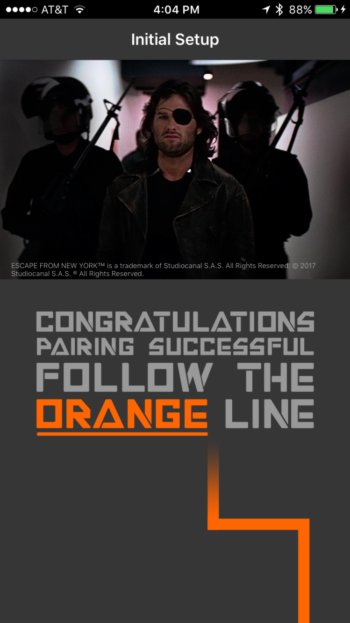
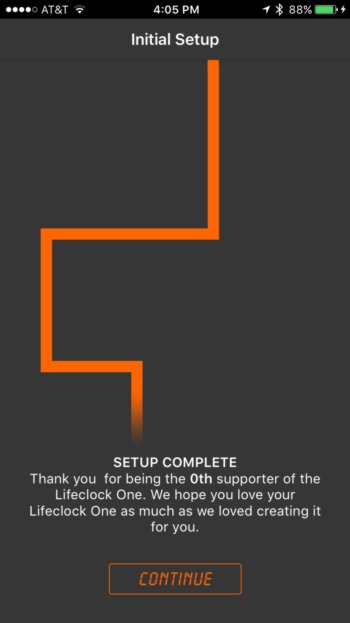
Congratulations! Your Lifeclock One is now paired with your device.
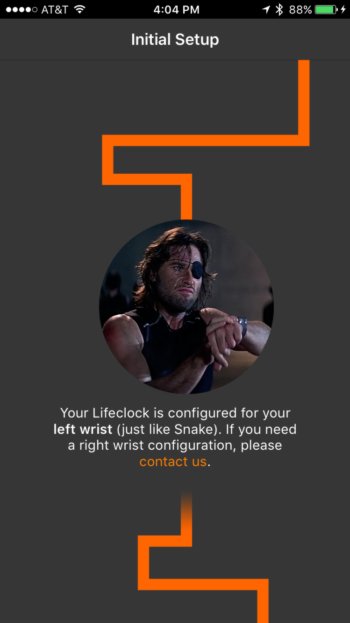
Now swipe through the final screen to confirm that your Lifeclock One is configured and then tap ‘Continue’ to complete the pairing process.
Battery & Charging
Your Lifeclock One is equipped with a battery that has a capacity of 480mAh. It is designed to specifically fit inside your Lifeclock One. Your Lifeclock One should last at least 3 days on a full charge, potentially up to 6 days with power optimizations turned on.
You can check the battery charge in two ways:
1. Press the bottom button five times. The screen will scroll your current battery charge level as a percentage.
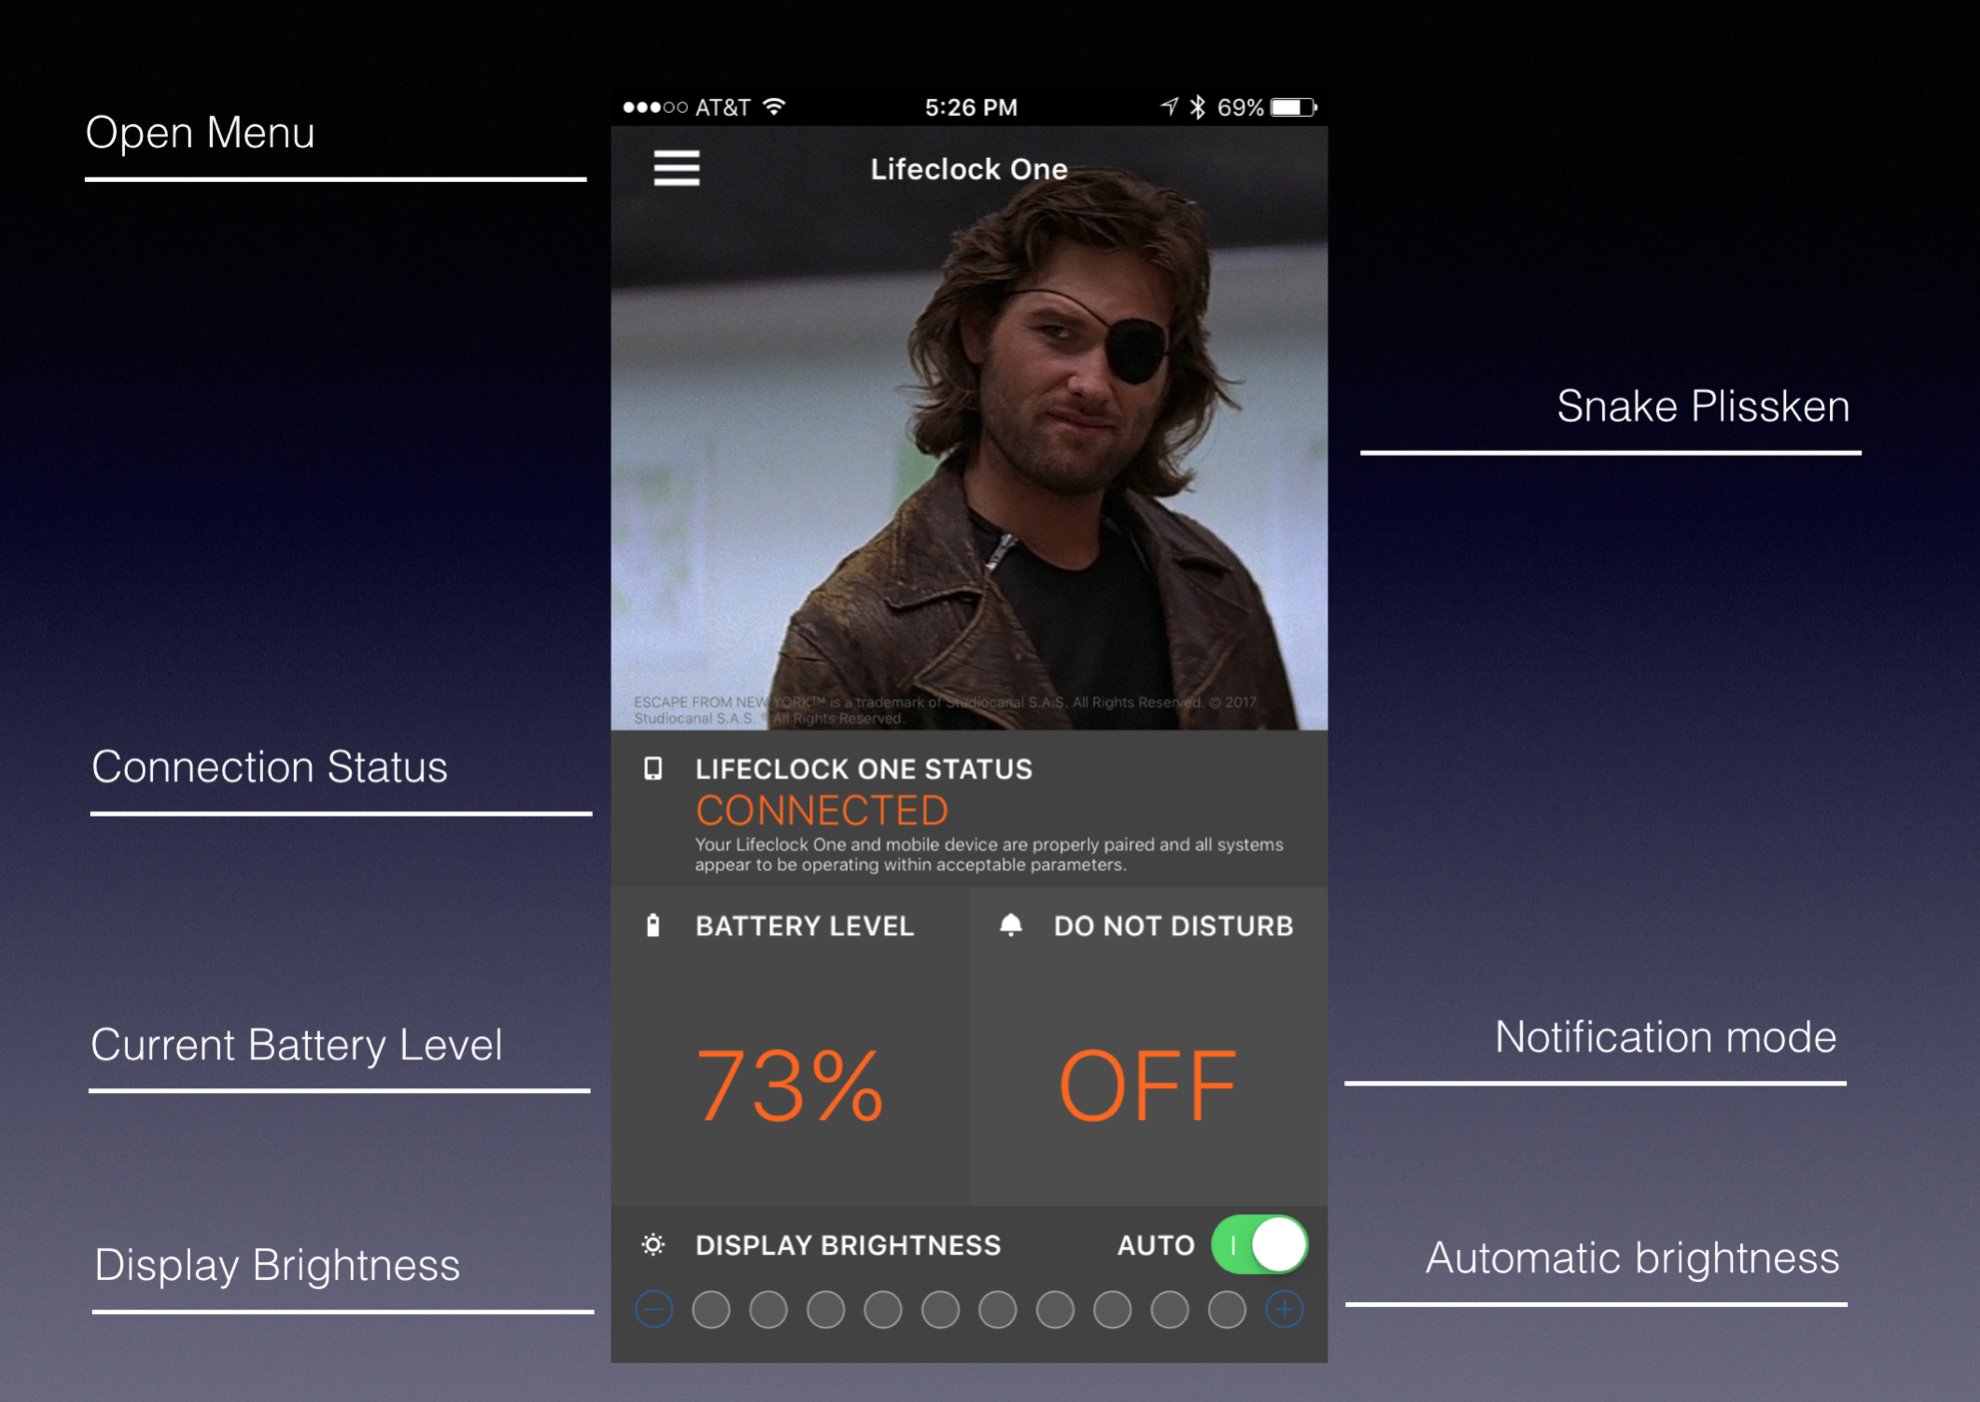
2. When in use, the App will show your battery percentage on the main screen.
The lifetime of each battery charge depends on your use of the Lifeclock One. If you get lots of notifications, your battery will drain faster. For example, to save battery life, you can manually turn the Bluetooth® radio off, which will dramatically extend the lifetime of each charge.
To turn the Bluetooth® radio off, press the bottom button five times, then press the top button twice to get to the Radio mode. Turn the radio off by pressing the bottom button once – the watch will display ‘RADIO-’. Wait a moment and the display will turn off. If your Lifeclock One is paired with your phone, the connection will drop.
Warning: YOUR LIFECLOCK ONE IS POWERED BY A LITHIUM POLYMER (LIPO) RECHARGEABLE BATTERY. THESE BATTERIES, IF LEFT INACTIVE FOR SEVERAL MONTHS, MAY FALL INTO A DEEP DISCHARGE STATE WHERE THE BATTERY LOSES ITS ABILITY TO RECHARGE. FOR LONG-TERM STORAGE, PLEASE BE SURE TO CHARGE AND DISCHARGE YOUR LIFECLOCK ONE AT LEAST ONCE EVERY TWO MONTHS TO PREVENT A DECREASE IN BATTERY PERFORMANCE; STORE YOUR LIFECLOCK ONE IN A DRY PLACE WITH LOW HUMIDITY AND AT A TEMPERATURE RANGE OF 11° TO 30° C, (50° TO 90° F); AVOID EXPOSURE TO TEMPERATURES HIGHER THAN 90° F (32° C).
Using the Lifeclock One without pairing
If you don’t have a supporting device or want to pair the Lifeclock One with your phone, see the ‘Setting Time & Date’ section on how to change the time and date manually. Without a supporting device you can use the following features:
- Time
- Date
- Stopwatch
- Countdown timer
- Battery status
- Compass
- Brightness
- Step counting
- About screen
Charging
Each Lifeclock One includes two (2) charging cables designed specifically for use with the watch. The charging cable has a standard USB connecter on one end which may use with any existing USB wall or auto charger, or even your PC/Laptop.
To charge your Lifeclock One, connect the charging cable to the back of your Lifeclock One. The cable is magnetically polarized and will only fit in one direction. Do not try to force the cable to connect – it should just automatically snap on to the watch. If it doesn’t, turn it around 180 degrees and try again.
SHOW IMAGE
Note: The Lifeclock One charging cable is designed only to be used with your Lifeclock One and is not compatible with other devices.
CHARGING MODE
When your watch is charging, you will see the charging indicator light turn on.
SHOW IMAGE
If you don’t see this light glowing, the watch is not charging. Make sure the charging cable is oriented the correct way. There are magnets inside your charging cable to ensure that you can only connect the charging cable the right way – if you feel the cable pushing against you when you try to connect it, turn it around the try the other way.
When your Lifeclock One is charging, you’ll see a red status light on the main screen. When the device is fully charged, this light will go off.
Only use the charging cable that came with your Lifeclock One. Each Lifeclock One ships with two charging cables, but you can purchase additional ones from our website.
It is possible that your Lifeclock One battery could experience a problem. If this happens, you’ll see the charging light blinking – different error conditions are displayed by flashing the charging light at different frequencies:
1.5Hz – Overheating condition.
6.1Hz – Faulty battery.
If you experience either of these conditions, please contact us and we’ll help you resolve the problem.
Before you use your Lifeclock One for the first time, you should charge the battery. Use the charging cable included in the box to charge your Lifeclock One. Plug the USB end of the cable into a regular wall adapter, or charge the Lifeclock One battery using a computer – connect the computer to the charging cradle using the USB cable included.
When battery power is getting low, you will see the word CHARGE on your watch when you press a button. If the battery charge is completely empty, the watch will shut down and need to be charged. A Lifeclock One with an empty battery cannot be turned on immediately after connecting the charger. Leave the watch to charge for a few minutes before turning the Lifeclock One on. Some features are not available while the battery is charging.
Note: The charging terminals on the back of your Lifeclock One may be subject to corrosion through exposure to sweat or other foreign material during the use of the product. Make sure you wipe the terminals with a cloth before charging.
The Lifeclock One charging cable is a custom USB cable which can be connected to a desktop, laptop or notebook computer for charging. Be sure your computer is properly grounded before connecting your product to the computer. The power supply cord of a desktop, laptop or notebook computer has an equipment-grounding conductor and a grounding plug. The plug must be plugged into an appropriate outlet that is properly installed and grounded in accordance with all local codes and ordinances.
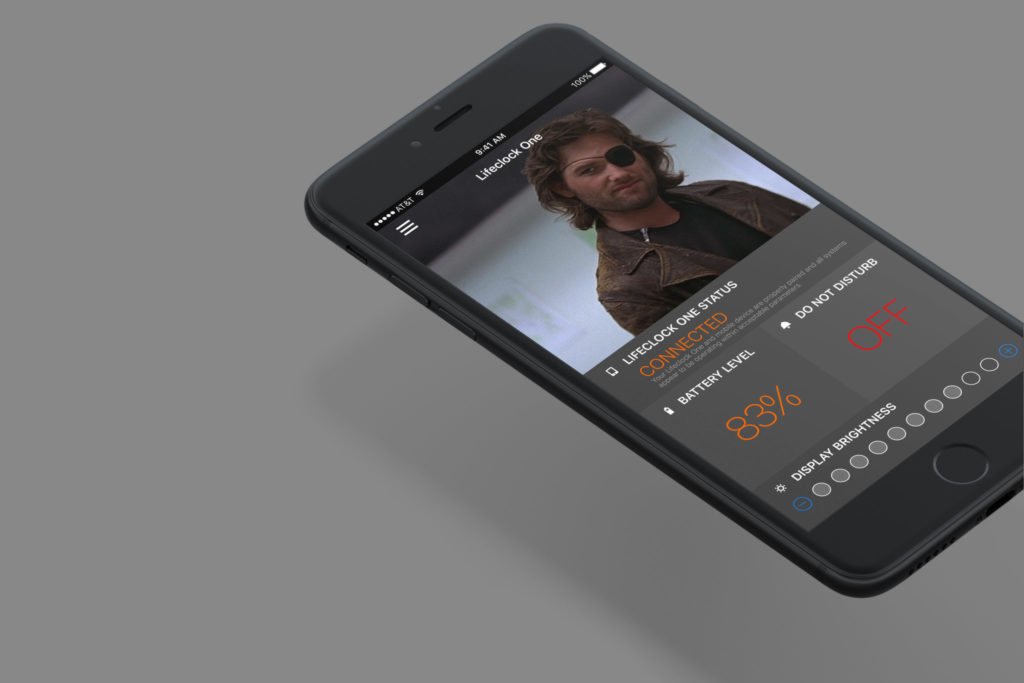
App Home screen (iOS)
Countdown Timer
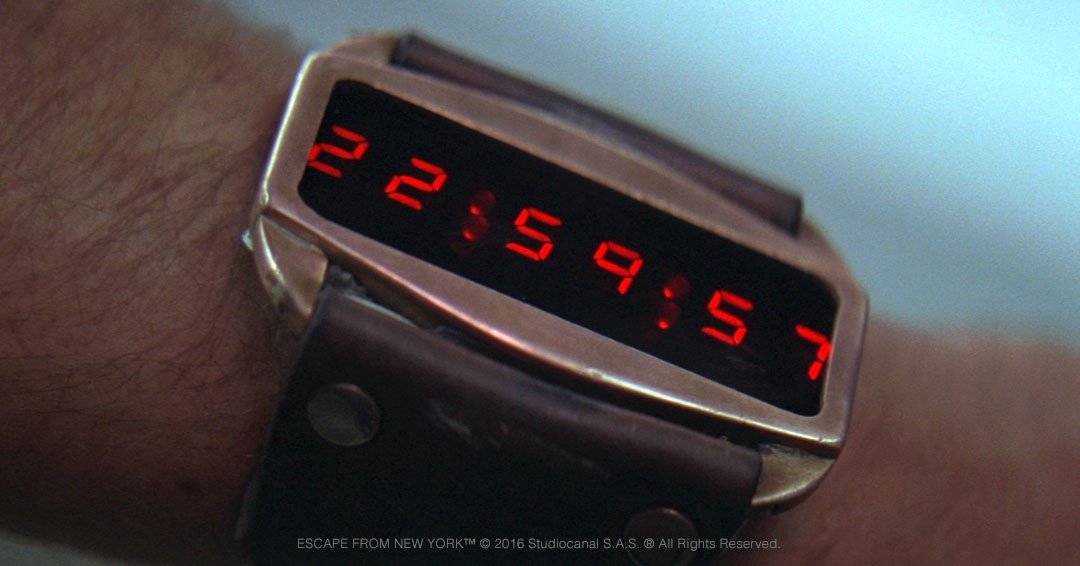
Your Lifeclock One has a countdown timer designed to mimic the countdown timer in the movie Escape From New York. The default starting time is 22:59:59 just like the movie.
To start the countdown timer:
- Press the bottom button twice to enter the countdown timer mode.
- To start the countdown, press the top button.
- Once the countdown begins it cannot be stopped until it reaches 00:00:00.
- When the countdown reaches 00:00:00…. well you’ll just need to see for yourself.
- While the countdown is active, you can let the display time out and turn off. The countdown will continue to work in the background.
Settings the Time & Date
When your Lifeclock One is paired with you mobile device, there is no need to set the time or date – the time and date are automatically synced via Bluetooth® to your Lifeclock One.
If you are not pairing your Lifeclock One with a mobile device via Bluetooth® , you must manually set or change the time and date. To manually set the time and date:
- Press the bottom button five times, then press the top button twice to get to the radio mode. Turn the radio off by pressing the bottom button once – the watch will display ‘RADIO-’. Wait a moment and the display will turn off.
- Press the top button once to show the time.
- Press and hold the top button for 6 seconds and you’ll see something like ‘HR 06’.
- To change the hour, press the bottom button to scroll to desired hour value.
- To move to minutes, press the top button. Press the bottom button to scroll to your desired minute value.
- To move to seconds, press the top button. Press the bottom button to scroll to your desired seconds value.
- To move to year, press the top button. Press the bottom button to scroll to your desired year value.
- To move to month, press the top button. Press the bottom button to scroll to your desired month value.
- To move to day, press the top button. Press the bottom button to scroll to your desired day value.
- After pressing the top button, you’ll see ‘Done’. The time and date on your Lifeclock One are now set.
Remember that in order to manually set the date and time, you must set your radio to ‘Off’. While your radio is ‘Off’ you won’t be able to pair it with a mobile device. To pair it with a mobile device, turn the radio to ‘On’ by pressing the bottom button four times, then press the top button twice to get to the radio mode. Turn the radio back on by pressing the bottom button once – the watch will display ‘RADIO*’. Wait a moment and the display will turn off.
Displaying the Time
To see the time on your Lifeclock One, press any button once. The time will be displayed for a number of seconds, then the display will turn off.
The length of time that the display stays on is called Display Duration. To change the Display Duration, you’ll need to use the App: from the main menu select ‘Display Duration’ and choose the number of seconds you want the display to remain on after activating a function.
You have two ways of displaying the time – 12 hour and 24 hour mode. To select the time display mode, you’ll need to use the App: from the main menu, select ‘Time and Date’ and toggle the switch marked ’24 Hours Format’ to choose which format to display the time in
Displaying the Date
To see the date on your Lifeclock One, press the top button twice and the date will be displayed.
The Lifeclock One supports several date formats:
- dd MMM (e.g. 25 Jan)
- MMM dd (e.g. Jan 25)
- mm/dd/yy (e.g. 01/25/16)
- dd/mm/yy (e.g. 25/01/16)
- dd MMMM (e.g. 25th January)
To select your date format, you’ll need to use the App. From the main menu select ‘Time and Date’ then ‘Date Format’ and tap on the format you would like to see when you view the date on your watch.
Behaviour
Your Lifeclock One looks awesome when the display is turned on – those high intensity LEDs are guaranteed to attract attention, but every time they turn on they consume power – a lot of power – from your battery. This is why the display turns off after a short period when you activate any function. To make sure that people get to see your Lifeclock One in all its glory, we designed a feature called ‘Behavior’. The available modes are:
- On Button Press (default)
- Every 5 minutes
- Every 10 minutes
- Every 30 minutes
- Every hour
Select the interval that you want the display to automatically turn on.
Connecting your Lifeclock One
You can turn the Bluetooth® connection to your Lifeclock One on or off. From the main menu, tap on the Connect toggle switch to change this setting. If you turn this setting off, several menu options will be hidden from the screen, as they cannot used when the Bluetooth® connection is off. These options will reappear when you reconnect to your watch.
Turning the Lifeclock on and off
You can turn your Lifeclock One on or off. When the watch is off, it goes into a very deep sleep state and can remain off for an extended period of time. You should remember to charge your Lifeclock One so that the battery does not completely drain.
To turn your Lifeclock One off, press and hold the bottom right button for 5 seconds – the watch will vibrate briefly and the display will come on.
To turn your Lifeclock One off, press and hold the bottom right button for 6 seconds – after 6 seconds your Lifeclock One will start to turn off with the message:
“POWERING OFF IN 5..4..3..2..1.. GOODBYE”
You can cancel the power off sequence at any time while this message is scrolling by pressing any button. If you cancel the power off sequence you’ll see the message ‘CANCEL’ and the watch will remain in the on state.
Stopwatch
To use the Stopwatch, press the top button three times.
You’ll see 00:00:00 on your Lifeclock One.
To start the stopwatch, press the bottom button once. To stop the stopwatch, press the bottom button while the stopwatch is running. You can continue the stopwatch from the last point you stopped it by pressing the top button again. To reset the stopwatch, while the stopwatch is stopped press and hold the bottom button for 3 seconds until the display resets to 00:00:00
When you start the stopwatch, it will continue to run with the display on. To have the stopwatch continue to run without the display on, press the top button twice to turn the display off. You can return to the stopwatch at any time and pick up where you left off.
World Clocks
The Lifeclock One allows you to see the current time in up to six time zones.
To add a time zone to your Lifeclock One, you’ll need the App. From the main menu, select ‘World Clocks’. Tap the ‘+’ button to add a new time zone – scroll through the list and choose the time zone you’d like to add. When you select one, the app will sync with your Lifeclock One.
To see the world clocks configured on your Lifeclock One, press the top button four times. If you have no world clocks configured you’ll see the message ‘NO WORLD CLOCKS CONFIGURED’.
Scroll Speed
The Lifeclock One App allows you to customize the speed at which data scrolls across the screen. To customize the scroll speed for your Lifeclock One, from the main menu select ‘Scroll Speed’ and tap on the speed that works best for you. As you tap on a speed setting, a preview will scroll across your Lifeclock One.
Camera
You can use your Lifeclock One to trigger the camera on your mobile device. To take a photo using your Lifeclock One:
- Make sure your phone is paired with your Lifeclock One.
- Open the Lifeclock One app on your mobile device and select ‘Camera’ from the menu. You can choose whether or not to use the front or back camera on your device. Set it down and line up the shot you want to take.
- On your Lifeclock One, press the bottom button four times – your Lifeclock One will say ‘CAMERA’.
- To take the photo, hold down the top button for three seconds.
Photos taken will be stored in your regular device photo album.
Alarms
Your Lifeclock One supports alarms. Setting an alarm works differently depending on whether or not your watch is paired with your phone.
Manually:
If your Lifeclock One is not paired with your phone, you can manually set a single alarm but you’ll need to make sure the radio is turned off. To set an alarm without the companion app:
- Press the bottom button five times, then press the top button twice to get to the Radio mode. Turn the Radio off by pressing the bottom button once – the watch will display ‘RADIO-’. Wait a moment and the display will turn off.
- Now press the bottom button three times. You’ll see ‘ALARM-‘ this means there is no alarm set.
- To set an alarm, when you see ‘ALARM-‘ press the top button. You’ll see ‘HR 00’ – use the bottom button to cycle through to the hour you want to use. Hours are 0 to 23.
- When you have selected the hour, press the top button to move to minutes. When you see ‘MIN 00’ use the bottom button to cycle through to the minutes you want.
- After you have selected the minutes you want, press the top button and you will see the word ‘DONE’ – the alarm is now set.
- With the display off, you can tell the alarm is set by pressing the bottom button three times and you’ll see ‘ALARM*’. If you press the top button, the alarm will be deleted and you’ll see ‘ALARM-‘.
Using the app:
You can set up to 6 alarms using the companion app. To set an alarm with the app:
- From the main menu select ‘Alarm’
- To create an alarm, tap ‘+’.
- Select the hour/minute/AM/PM for your alarm and tap ‘Save’.
- To keep an alarm but disable it, tap the selector switch to off.
- To delete an alarm, swipe it to the left and tap ‘Delete’.
Compass
Your Lifeclock One comes equipped with an onboard accelerometer and compass. To use the compass press the bottom button four times, followed by the top button twice.
As you turn around in a circle, your Lifeclock One will report your current heading both in direction (N, S, E, W) and degrees (0 to 359). If the compass doesn’t appear to be showing a valid direction, it could be the USPF jamming your signal. You’ll need to move to higher ground and try again.
Pedometer / Step Counting
Your Lifeclock One comes with a 3-axis accelerometer to measure your motion patterns; specifically it can count the number of steps you take while wearing the Lifeclock One.
However, the Lifeclock One is not a fitness specific device. We count the number of steps you take and report the number as it gets recorded – the Lifeclock One doesn’t make any recommendations on your data. We also don’t store your data anywhere online – it only lives on your watch and your phone.
As steps are counted, they are synced with your phone via Bluetooth®. If you want to preserve the step data you can email it to yourself. We do not record or store your step data on any remote server.
To view your step count on your phone, select ‘Pedometer’ from the main menu. You can see a summary of how many steps you’ve taken on a daily basis.
To view your step count on your Lifeclock One, press the bottom button four times, then press the top button once to display ‘Steps’. Now press the bottom button to cycle through your step count summary – Today and Yesterday.
Movie Mode
You can customize your experience with your Lifeclock One by triggering quotes from the movie to be displayed on your watch at specific periods.
To configure Movie Mode, select ‘Movie Mode’ from the main menu. The options are:
- No thanks (default – no quotes are shown)
- Random Quotes (display a random quote from the Quote List every hour, 2 hours, or once a day)
Your Lifeclock One is configured with a set of quotes from the movie – you can remove these or add your own quotes. To customize the list of quotes, tap ‘Customize Quotes’. Add your own quotes in the text box at the bottom and tap ‘Add’. You can remove existing quotes by swiping the quote to the left and tapping ‘Delete’.
Brightness
The brightness of the LED displays of your Lifeclock One play a big role in how you use the watch. The brighter the displays, the more attention you’ll get – but the more power the watch will consume. So we’ve given you ways to control the brightness to give you the exact experience the you want. You can set the brightness in two ways:
Using the App: To control the brightness on the App, adjust the slider on the bottom home screen of the app. Alternatively you can use the on board ambient light sensor to automatically adjust the brightness of the display. When the Auto switch is turned on, the watch will automatically dim the displays when it’s dark and raise the brightness when it’s light outside to compensate and make the displays visible even in bright sunlight.
Manually: You can also adjust the brightness of the display on the watch itself. Press the bottom button five times, then the top button once – the watch will say ‘BRIGHT’. Press the bottom button to begin changing the setting, then press the top button to change the setting – contiguous top button presses cycle through the following range of settings:
AUTO, LOW, 1, 2, 3, 4, 5, 6, 7, 8, 9, MAX
Animations
Your Lifeclock One supports a number of display animations. The App allows you to customize the look and feel of how your Lifeclock One displays the time, date and other types of information.
There are two types of animations:
- Reveal Animations: how information is animated when it’s revealed and hidden.
- Character Animations: how information is animated as it changes.
You can also change the animation speed. The options for animation speed are: Slow, Normal and Fast.
To change the Reveal Animation, from the main menu select ‘Animations’ then ‘Reveal Style’. Tap on any animation to see what it looks like on your Lifeclock One. If you don’t want any animations, tap ‘None. To change the Reveal animation speed, tap ‘Reveal Speed’ and choose your speed.
To change the Character Animation, from the main menu select ‘Animations’ then ‘Character Animation’. Tap on any animation to see what it looks like on your Lifeclock One. If you don’t want any animations, tap ‘None. To change the Character animation speed, tap ‘Character Speed’ and choose your speed.
Tap ‘Reset to Default’ to set all animation configuration back to the factory default, which is none.
Display Duration
The length of time that the display stays on is called Display Duration. To change the Display Duration, you’ll need to use the App: from the main menu select ‘Display Duration’ and choose the number of seconds you want the display to remain on after activating a function.
App Notifications
You can receive app notifications on your Lifeclock One for a number of your mobile apps including incoming calls, text messages, email, calendar and other social network apps. App notifications will only appear on your Lifeclock One when it’s connected and in range of your mobile device.
To enable notifications on your Lifeclock One, from the main menu tap ‘Notifications’.
Notifications can be enabled or disabled using the ‘Mode’ option – to enable *any* notifications select ‘On’. To mute *all* notifications, select ‘Do Not Disturb’.
Each category of notification has three modes:
- Off – disable this notification.
- On – show this notification on your Lifeclock One
- Vibro – show this notification on your Lifeclock One and vibrate your watch when the notification arrives.
The default settings for all notifications are Incoming Calls and Texts set to ‘Vibro’.
When an app notification arrives, your Lifeclock One will vibrate, and a status light will start to glow. As additional notifications arrive, your Lifeclock One will vibrate and queue up behind all unread notifications. When you see a glowing red light on your Lifeclock One, press the top button to read and scroll through each notification. When you reach the last notification, the display will turn off. Once you’ve read a notification it is removed from the queue and you cannot read it again on your watch.
Notifications on your Lifeclock One are designed to be actioned within 60 seconds. The notification indicator light will pulse for 60 seconds from the last notification you received. If you don’t read notification on your Lifeclock One within 60 seconds, the indicator light will turn off and the notification will be dismissed from your Lifeclock One.
The ‘Incoming Calls’ category works a little differently – when your phone receives an incoming call, it will vibrate every 5 seconds as the name or number of the incoming caller is displayed. If the incoming number is in your Contact list, the name of that contact will scroll across your watch. If it isn’t, the phone number will scroll across the watch instead.
On iOS, if you clear a notification while the Lifeclock One indicator light is flashing, the indicator will stop flashing and the notification will be removed the watch’s queue.
Notification messages are limited to 128 characters in total. This includes the name of the app, the person sending the notification and the message itself. Let’s look at an example:
SNAKE PLISSKEN – CALL ME SNAKE
This message is a total of 30 characters. It’s important to understand this limitation – messages that exceed 128 characters will still appear but they will be truncated after the 128th character.
The notification queue is limited to 16 messages. If the message queue is full and a new (17th) message arrives – the oldest one will be discarded.
Software Update / Update Mode
From time to time there may be updates to the Lifeclock One operating system and software. The updates may be to fix bugs or provide new features. Either way, the firmware updates require that you connect the Lifeclock One to a mobile device with the App using a Bluetooth® connection.
When a new firmware version is available, we will notify you through the App or you can also check for updates manually. To check for updates, from the main menu of the App, select ‘Software Updates’.
When the Lifeclock One is in Update Mode, you’ll see an animation slash bouncing left and right across the screen. The manually get out of Update Mode, hold the bottom button down for three seconds. To manually put the Lifeclock One into Update Mode, turn it off (power down) and then hold both buttons down for 5 seconds.
Wrist Configuration
When your Lifeclock One watch was ordered you were asked on which wrist you would wear the device. The reason is that though the Lifeclock One watch can be configured for either wrist the configuration is done at assembly and cannot be changed. The watch you receive has been manufactured to the orientation you specified when you placed your order and cannot be changed after the fact.
Left Wrist configuration: action buttons are set on the right of the watch.
Right Wrist configuration: action buttons are set on the left of the watch.
About your Lifeclock One
You can check the configuration of your Lifeclock One on the device itself or through the App.
To check your Lifeclock One configuration on your phone, please make sure your Lifeclock One is paired with your phone. From the menu, select ‘About’. From this menu you can see configuration for: app version, firmware version, boot loader version, serial number, wrist configuration and owner name.
The About Menu will also give you access to a number of content pages on our website, as well as special functions designed to help you recover from certain error conditions. These include, but are not limited to:
∙ Open Source: Details of open source software and libraries included in our product.
∙ Terms Of Use: Terms of use of our product and website.
∙ Soft Reset: This will perform a soft reset of your device. This option should reset most error conditions you encounter on your watch.
∙ Factory Reset: This will perform a factory reset of your device but will retain serial number, material and wrist configuration data. When you perform a factory reset, the watch is restored to original factory state which means that it loses it’s pairing information. If you want to pair the watch with the same device it was previously paired with, you’ll need to tell that device to ‘Forget/Delete’ the Lifeclock One before you can pair it again.
∙ App Factory Reset: This will reset your app to original install state.
∙ Exit Update Mode: This will take your watch out of update mode.
To check your Lifeclock One configuration on the device: press the bottom button five times, then press the top button three times, then press the bottom button once. The following information will scroll across your Lifeclock One:
THIS LIFECLOCK BELONGS TO <Name> Serial number <Serial No> <Brass/Aluminum> CASE <Left/Right> WRIST FIRMWARE <Firmware version> BOOTSTRAP <Bootloader version> SOFTDEVICE <Softdevice version>
Note: your serial number is configured during assembly in our factory and cannot be changed. It will match the serial number engraved on the back of your case.
Supported Characters
The Lifeclock One uses custom 12 segment LED displays (11 segments and the decimal point) that only support a limited number of characters. The Lifeclock One is only designed to support the English language.
It’s important to note that due to the nature of these custom true LED segment displays, they are limited to the English character set only. We’ve made some customizations so that we can support the full English alphabet (A through Z) as well as the full number set 0 through 9. There is no upper or lower case on the Lifeclock One – each character is uniquely presented. There are no immediate plans to offer any non-English character sets. This is the supported list of characters:
A B C D E F G H I J K L M N O P Q R S T U V W X Y Z
0 1 2 3 4 5 6 7 8 9 0
‘ ( ) { } [ ] * + – / = _ ! | ~ ` ? < > . SPACE
% becomes PERCENT
$ becomes DOLLARS
& becomes AND
: and ; become –
All other characters are considered non-printable and converted to *
So for example, if you receive a text message from Snake Plissken that says ‘You owe me $10’ – you’ll see the following message scroll across your Lifeclock One:
SNAKE PLISSKEN – YOU OWE ME 10 DOLLARS
Device Reset
We’ve worked hard to make sure your Lifeclock One performs perfectly, but sometimes it might get a little confused. There are several ways to resolve this.
Soft Reset
This will normally reset everything back to normal. All of your existing settings will be kept but the watch will reset itself. There are two ways to perform a soft reset:
-
-
- Press and hold the top button for 10 seconds. The watch will vibrate briefly and then the time will be displayed.
- From the main menu of the App, from the main menu select ‘About’ then ‘Soft Reset’. You’ll be prompted to confirm – tap ‘Yes’ to perform the reset.
-
Factory Reset
A factory reset will restore your Lifeclock One to original factory status. This will change all settings back to their original state (except serial number, wrist configuration and material type – these cannot be changed.. It will also un-pair your watch from your mobile device. There are three ways to perform a factory reset:
1. Press the bottom button five times, then the top button three times – the watch will say ‘RESET’ – press the bottom button to initiate the factory reset.
2. From the App, from the main menu select ‘About’ then ‘Factory Reset’. You’ll be prompted to confirm – tap ‘Yes’ to perform the reset.
After you perform a factory reset, if your Lifeclock One was paired with your device that pairing will be gone. Even though the Lifeclock One will appear in your list of devices under your device Bluetooth® settings, you will not be able to restore that setting and you’ll need to remove that entry from your device. To remove the Lifeclock One device entry from your mobile device:
iOS: Go to Settings -> Bluetooth®. Find the Lifeclock One entry (e.g. Lifeclock 00034) and tap on the (i) icon then tap ‘Forget this Device’.
Android: Go to Settings -> Bluetooth®. Find the Lifeclock entry and tap the gear icon and select ‘Forget Lifeclock’.
If you want to re-pair your Lifeclock One, return to the app, and from the main menu toggle the ‘Connect’ switch – you’ll be prompted to pair the Lifeclock One again and tap ‘Yes’ to confirm. The watch should re-pair with your phone.
Cleaning and Maintenance
Case Front (Snake Edition): [Brass instructions]
Case Front (Gullfire Edition): [Aluminum instructions]
Case Back: The Lifeclock One case back is made of 316L stainless steel or aluminum. You can safely clean off any dirt with a soft damp cloth.
Crystal Screen: If your Lifeclock One screen gets smudged or dirty, you can clean it with a damp cloth followed by a dry cloth. Only use a soft cloth such as a lens cleaning cloth.
THE LIFECLOCK ONE WATCH IS NOT WATER RESISTANT. The Lifeclock One may be subject to water damage – do not immerse your Lifeclock One in water. The watch must not be exposed to water at high pressure, such as a shower, under a faucet, ocean waves or a waterfall. If your Lifeclock One or your hands become wet, dry them thoroughly before handling the watch. The watch must not be exposed to salt water, ionised water or soapy water. The watch’s water and dust resistant features may be damaged by dropping or receiving an impact. If your Lifeclock One gets wet, use a clean, soft cloth to dry it thoroughly.
Strap Maintenance
Your Lifeclock One watch strap is completely custom made. It is made with thick, high quality leather and has been rigorously tested. Before wearing your strap, please bend it back and forth a few times to soften it up – this will help you feel more comfortable when wearing it. Note, some people may have an allergic reaction to the Lifeclock One Watch if you are allergic to nickel as there are trace amounts of it in the stainless steel back plate.
Legal Notice
By using your LifeClock One you expressly agree to the Ridgewood Watch Company Services, Terms and Conditions available on our website at lifeclockone.com. This product us not a medical device and should not be used to diagnose or treat any medical condition.
Make sure you have read our privacy policy, which you can find on our website. We do not store any personal information you record on your watch. We record your serial number and your name so that we can better tailor communications with you. We do not track your usage of any services or sensor data from your Lifeclock One.
Safety Instructions – Use and Storage
- Use the product at temperatures between -10°C and 45°C (14°F and 113°F). Exposure to high or low temperatures may shorten battery life.
- The Lifeclock One may be stored in a clean, dry location between -20°C and 75°C (4°F and 135°F) when not in use.
- Avoid any extreme temperature changes.
- Avoid damaging the power cord by heating, bending, twisting, pulling or placing heavy items on it.
- Avoid any kind of physical or thermal shocks as they may damage internal and external components of your watch.
- Avoid dropping your Lifeclock One. Dropping it, shaking it or striking it can potentially cause damage.
- Don’t leave your Lifeclock One in your car – high temperatures may cause malfunction.
- Keep the front glass crystal of your Lifeclock One away from any sharp or hard objects to prevent any scratches.
- Keep your Lifeclock One and its charging cable out of reach from children, as it contains small parts and may present a choking hazard.
- Operating/reading your Lifeclock One while driving is not recommended, and may be illegal in your state. Please refer to your state laws for further information.
- Dispose of your Lifeclock One in accordance with local regulations for used batteries. Contact your local recycling center or national recycling organizations for more information on how to dispose of batteries. Warning: Never dispose of batteries in a fire as they may explode.
- Keep your Lifeclock One away from small children. It is not a toy and It may be hazardous to small children.
- The front screen of your Lifeclock One is made of glass. The glass could break upon substantial impact. If the glass breaks, do not touch or attempt to remove. Stop using your Lifeclock One and contact us to arrange purchasing a replacement glass crystal.
- Your Lifeclock One contains a Bluetooth radio. When in use, this radio receives and transmits Radio Frequency (RF) energy. This radio is designed to comply with US and EU regulatory requirements concerning exposure of human beings to RF energy. Nearly every electronic device is subject to RF energy interference from external sources if inadequately shielded, designed, or otherwise configured for RF energy compatibility. In some circumstances, your Lifeclock One may cause interference with other devices. If you’re on a plane, turn off your Lifeclock One whenever instructed to do so by an airline staff member. Turn off your Lifeclock One in any location where instructed to do so. If you have an implantable medical device, such as a pacemaker or defibrillator, consult your physician before using your Lifeclock One.
- Do not disassemble or open crush, bend or deform, puncture or shred the battery.
- Do not modify or remanufacture, attempt to insert foreign objects into the battery, immerse or expose to water or other liquids, expose to fire, explosion or other hazard.
- Make sure that no sharp-edged items, such as animal’s teeth or nails, come into contact with the battery. This could cause a fire.
- Only use the battery for the system for which it is specified. Use of an unqualified battery or charger may present a risk of fire, explosion, leakage, or other hazard.
- Do not short circuit a battery or allow metallic conductive objects to contact battery terminals.
- Avoid dropping your battery. If the phone or battery is dropped, especially on a hard surface, and the user suspects damage, take it to a service center for inspection. Improper battery use may result in a fire, explosion or other hazard.
- Always unplug the charger from the wall socket after the product is fully charged to save unnecessary power consumption of the charger.
- There is a risk of explosion if the battery is replaced with an incorrect type. For your safety, do not remove the battery. If you need to replace the battery, contact Ridgewood Watch Company directly. Attempting to replace the battery by non-qualified professional can cause damage to your Lifeclock One.
Water Resistance
- Your Lifeclock One is not waterproof. It should resist light sprinkles / splashes of water.
- Do not go swimming or diving with your Lifeclock One.
- Do not shower or bathe while wearing your Lifeclock One.
- If your Lifeclock One gets wet, don’t attempt to dry it with any heat source, such as a hair dryer or microwave oven. Allow it to dry naturally at room temperature.
- Avoid any exposure to salt water.
Safety
- Do not expose the Lifeclock One to fire, explosion, or other hazards.
- Avoid exposure to any chemical products such as solvents, detergents, perfumes or cosmetics. They may damage the wristband or the casing of the watch.
- Avoid extreme atmospheres (e.g., saunas or steam rooms).
- Avoid opening the watch back case of your Lifeclock One as it may damage the water resistance of the watch.
- The aging of the materials may affect the water resistance of the watch.
- Water resistance cannot be permanently guaranteed.
- Do not insert foreign objects into your watch.
- Do not place the Lifeclock One in a microwave or regular oven.
- Like many electronic devices, the Lifeclock One generates heat during normal operation. Extremely prolonged, direct skin contact in the absence of adequate ventilation may result in discomfort or minor burns. Therefore, use care when handling your Lifeclock One during or immediately after operation.
Service and Maintenance
- Avoid any contact with your watch strap and water or humidity to prevent any discoloration or deformation of your strap.
- Avoid any contact of your Lifeclock One case or wristband with greasy substances and cosmetic products.
- Avoid long exposure of your Lifeclock One wristband to sunlight to prevent any discoloration.
- Do not attempt to repair or modify your Lifeclock One yourself. If you are experiencing problems with your Lifeclock One, please contact our support team at lifeclockone.com/support.
Responsible Use
Please don’t use the Lifeclock One in an irresponsible manner. Do not misrepresent the watch to be anything other than a watch / movie prop. Don’t try to be a smartass and pretend the watch is anything other than a really cool watch. For example, if you’re at an airport, don’t misrepresent the watch as anything other than a watch.
Regulatory Statements
The FCC ID of the Lifeclock One is O6R2398
This device complies with Part 15 of the FCC Rules. Operation is subject to the following two conditions: (1) this device may not cause harmful interference, and (2) this device must accept any interference received, including interference that may cause undesired operation.
CAUTION: Change or modification not expressly approved by the party responsible for compliance could void the user’s authority to operate this equipment. This equipment has been tested and found to comply with the limits for a Class B digital device, pursuant to Part 15 of the FCC Rules. These limits are designed to provide reasonable protection against harmful interference in a residential installation.
This equipment generates, uses and can radiate radio frequency energy and, if not installed and used in accordance with the instructions, may cause harmful interference to radio communications. However, there is no guarantee that interference will not occur in a particular installation. If this equipment does cause harmful interference to radio or television reception, which can be determined by turning the equipment off and on, the user is encouraged to try to correct the interference by one or more of the following measures:
–Reorient or relocate the receiving antenna.
–Increase the separation between the equipment and receiver.
–Connect the equipment into an outlet on a circuit different from that to which the receiver is connected.
–Consult the dealer or an experienced radio/TV technician for help.
CAUTION:
Any changes or modifications not expressly approved by the grantee of this device could void the user’s authority to operate the equipment. RF exposure warning. This equipment must be installed and operated in accordance with provided instructions. End-users and installers must be provide with antenna installation instructions and transmitter operating conditions for satisfying RF exposure compliance.
This device meets the FCC and IC requirements for RF exposure in public or uncontrolled environments.
Canada: Industry Canada (IC) statement
IC Notice to Users English/French in accordance with RSS GEN Issue 3:
This device complies with Industry Canada license exempt RSS standard(s).
Operation is subject to the following two conditions:
1. this device may not cause interference, and
2. this device must accept any interference, including interference that may cause undesired operation of the device.
This Class B digital apparatus complies with Canadian ICES-003.
Cet appareil numérique de la classe B est conforme à la norme NMB-003 du Canada.
International EU Declaration of Conformity
Manufacturer: Ridgewood Watch Company LLC, 2020 Howell Mill Road, Suite D-143, Atlanta, GA 30318, USA
Standards: EN 300 328 V2.1.1, EN 301 489-1 V1.9.2, EN 301 489-17 V2.1.1, EN 60950-1:2006 + Am A2:2013, EN 62479: 2010, RoHS Directive 2011/65/EU, EN50581: 2012. We declare under our sole responsibility that the products listed above conform with the following standard(s) or other normative documents:
The equipment described above is declared to be in conformity with these applicable national and international standards. The conformity is valid ONLY when the equipment is used in a manner consistent with the manufacturer’s specifications and the reference documents. We hereby declare on behalf of Ridgewood Watch Company LLC of Atlanta, GA that the above reference product(s) to which this declaration relates is in conformity with the provisions of the Radio Equipment Directive 2014/53/EU.
© 2017 Ridgewood Watch Co., ESCAPE FROM NEW YORK™ is a trademark of Studiocanal S.A.S. All Rights Reserved. © 2017 Studiocanal S.A.S. ® All Rights Reserved.


